

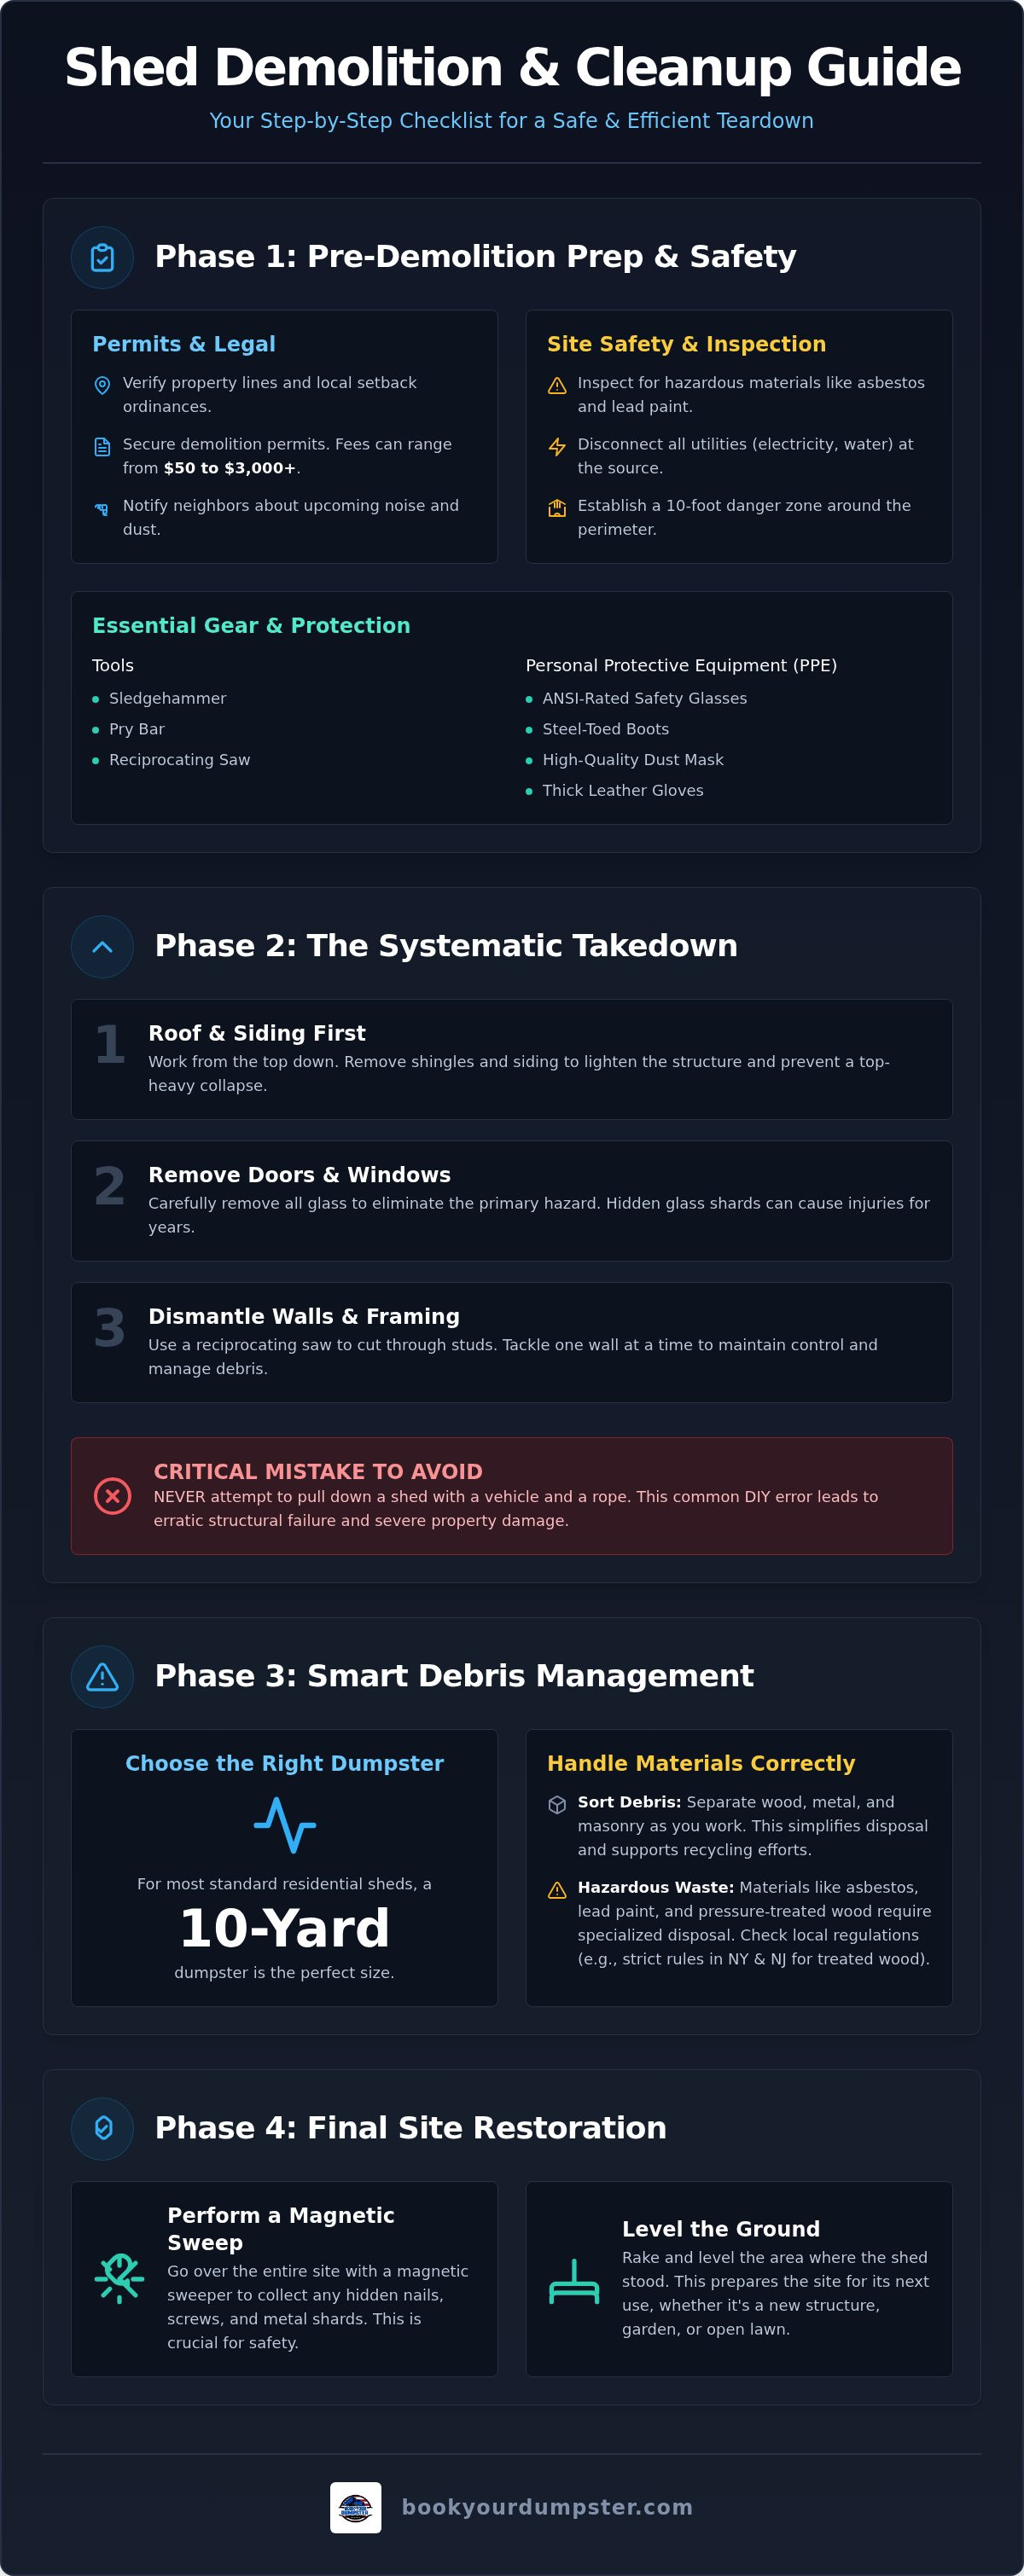
Successful shed demolition isn't about the swing of the sledgehammer; it's about the logistics of the debris exit strategy. You likely look at that weathered structure and see a straightforward weekend task, yet the reality of shed demolition clean up often brings unexpected stress. Between managing piles of treated lumber and navigating local permit requirements that can cost anywhere from $50 to over $3,000, it's easy to feel overwhelmed before you even start.
Follow this comprehensive 2026 checklist to tear down your old shed safely and dispose of the waste with professional-grade efficiency. We've simplified the process into actionable steps that address hidden hazards like lead paint and asbestos while ensuring you avoid municipal fines. You'll learn how to identify salvageable materials, handle utility disconnections, and select the right disposal tools to leave your site clear for your next project. This guide moves you from a state of clutter to a clean slate without the logistical headache. Stop worrying about the volume of debris and start following a plan that guarantees a clear site and cost-effective results.
Key Takeaways
- Identify hazardous materials like lead-based paint and asbestos shingles before beginning any structural work to ensure site safety.
- Use a systematic roof-down approach to prevent unpredictable collapses and minimize broken glass hazards during the teardown.
- Simplify your shed demolition clean up by choosing the right container size, typically a 10-yard dumpster for standard residential structures.
- Navigate local regulations in New York and New Jersey, specifically focusing on the strict disposal requirements for pressure-treated wood.
- Perform a final magnetic sweep of the site to remove hidden nails and screws before leveling the ground for your next project.
Pre-Demolition Checklist: Preparing Your Site and Safety
Success in any shed demolition clean up starts long before you swing the first hammer. Verify your property lines and local set-back ordinances first. Many homeowners assume their shed is legally placed, but city codes often change over decades. Moving a structure or its debris across a property line can trigger legal disputes or municipal fines. If you're unsure about placement, visit Book Your Dumpster USA to secure a rental that fits within your legal boundaries while you clear the site.
Inspect the structure for hazardous materials immediately. Older sheds often contain asbestos shingles or lead-based paint, especially those built before 1978. These materials don't belong in a standard landfill and qualify as specific types of Demolition waste that require specialized disposal. Clear a 10-foot danger zone around the entire perimeter. This buffer prevents falling timber or shingles from hitting bystanders or pets. Gather your essential tools before the first strike. You'll need a heavy-duty sledgehammer, a pry bar for stubborn nails, a reciprocating saw for framing, and thick leather gloves.
Utility Disconnection and Permit Verification
Check for live electrical lines or water pipes running from your main house to the shed. Never assume the power is off just because a light switch doesn't work. Disconnect all utilities at the source. If you live in major hubs like Chicago or Boston, verify your demolition permit rules immediately. Permit fees can range from $50 to over $3,000 depending on the structure's size and location. Notify your neighbors before you start. A quick heads-up about noise and dust maintains good relationships and prevents surprise complaints to the city.
Safety Gear and Personal Protection
Wear ANSI-rated safety glasses and steel-toed boots throughout the project. A high-quality dust mask is non-negotiable, particularly for older wood structures where mold, rot, or dried animal droppings might be present. Managing physical strain is a critical part of shed demolition clean up. Lift with your legs and take frequent breaks. Most DIY demolition injuries happen during the final hours when fatigue leads to sloppy footwork or poor tool handling. Stay sharp and keep your workspace clear of tripping hazards to avoid unnecessary accidents.
The Systematic Takedown: Tearing Down Without the Chaos
Effective demolition is actually reverse engineering. Do not approach your shed with the goal of simply smashing it. This leads to unpredictable debris paths and increased injury risks. Instead, work from the top down. Start by removing the roofing materials and sheathing. This process lightens the overall structure and prevents a top-heavy collapse while you are working inside or near the walls. A systematic approach ensures your shed demolition clean up stays organized from the first strike to the final load.
Remove doors and windows before tackling the framing. Glass is a primary hazard in any demolition project. Shards hidden in the grass are nearly impossible to recover and can cause injuries for years. Unscrew hinges and pull window frames carefully. Set these components aside in a designated staging area. Once the openings are clear, move to the walls. Use a reciprocating saw with a demolition blade to cut through the studs. Work wall by wall, starting with the non-load-bearing sections. This keeps the debris manageable and allows you to maintain control over the site.
Roof and Siding Removal Strategies
Stripping asphalt shingles is the fastest way to reduce the weight of the structure. Use a shingle shovel or a pitchfork to pry them loose, working from the peak down to the eaves. If your shed has vinyl or wood siding, remove it in full sections whenever possible. This prevents the creation of thousands of small scraps that complicate your shed demolition clean up. Stacking materials by type as you go is essential. Follow the EPA guidelines on C&D materials by separating wood, metal, and masonry for better waste management. To keep your lawn clear of these growing piles, you can rent a roll-off dumpster to consolidate waste as it's generated.
Managing Structural Integrity During Takedown
Never attempt to pull down a shed using a vehicle or a rope. This is a common DIY mistake that results in erratic structural failure and potential property damage. If the shed feels unstable as you remove the roof, use temporary 2x4 bracing to secure the walls. Larger barn-style sheds often have specific load-bearing points at the corners and center plates. Identify these before you cut. Once the walls are down, tackle the foundation. If you have a wood floor on pressure-treated skids, cut the skids into four-foot sections for easier lifting. Concrete pads may require a sledgehammer or a small jackhammer to break into haulable chunks. Clear each layer completely before moving to the next to maintain a safe, organized workspace.
Debris Disposal Checklist: Dumpster Sizing and Logistics
Once the structure is down, the real work of shed demolition clean up begins. You are now looking at a massive pile of lumber, shingles, and hardware. Calculate the volume of your debris before choosing a disposal method. A standard 10x12 shed creates significantly more bulk than its footprint suggests because of the air gaps between collapsed panels. Manual hauling often seems cheaper but rarely is. You'll face multiple trips to the landfill, high fuel costs, and per-ton disposal fees. Most residential vehicles aren't rated for the weight of a full demolition load, risking damage to your suspension and tires.
A 10 yard dumpster rental is the gold standard for most garden sheds. It provides ample space for an 8x10 or 10x12 structure while occupying a small footprint on your property. To maximize every cubic inch, break down large wall panels and roof trusses into smaller sections. Lay flat items like plywood and shingles at the bottom. This prevents "bird-nesting," where tangled lumber creates empty pockets that waste space. Following these EPA guidelines on C&D debris ensures you categorize your waste correctly, which is vital for efficient processing at the facility.
Choosing Between 10, 20, and 30 Yard Dumpsters
Select your container based on the shed's contents and size. A 10-yard dumpster handles standard garden sheds and basic yard debris easily. If your shed was a larger workshop or packed with decades of old furniture and junk, size up to a 20-yard container. This prevents the risk of overfilling, which can lead to safety hazards during transport. Commercial-grade outbuildings or multiple structures on one property usually require a 30-yard container. This larger size accommodates the heavier framing and increased volume of larger-scale projects without requiring a second rental.
The Logistics of Roll-Off Placement
Ensure a flat, stable surface is ready for your delivery. Soft soil or uneven grass can cause the heavy container to sink or tip. Driveway protection is essential for any shed demolition clean up. Place two sheets of thick plywood where the dumpster's wheels and rails will rest. This distributes the weight and prevents asphalt cracking or concrete scratches. Schedule your delivery for the day before you plan to start the takedown. This allows you to move debris directly from the structure into the dumpster, eliminating the need to handle the waste twice and keeping your site organized from start to finish.
Local Regulations and Hazardous Waste Management
Compliance is just as critical as the physical teardown. In New York and New Jersey, construction debris is strictly regulated to prevent environmental contamination. You must separate hazardous items before your shed demolition clean up is considered complete. Pressure-treated wood is a primary concern. It contains chemical preservatives like chromated copper arsenate (CCA) or alkaline copper quaternary (ACQ). Never burn or compost this lumber. Burning releases toxic fumes, and composting leaches chemicals into the soil. These materials must go to specific facilities or be handled through professional waste services.
Inspect your structure for lead-based paint if it was built before 1978. Lead dust is a significant health risk during demolition. If you find flaking paint, use wet-sanding techniques to minimize airborne particles. Managing "shed junk" requires a separate strategy. Most sheds act as graveyards for old pesticides, fertilizers, and fuel tanks. These items are prohibited in standard roll-off containers. Set them aside and contact your local municipality for household hazardous waste (HHW) collection days. Mixing these chemicals with standard wood debris can lead to rejected loads and heavy environmental fines.
Regional Disposal Standards in the Northeast and Midwest
Massachusetts has enacted specific waste bans on materials like asphalt shingles and metal. You cannot simply toss these into a general landfill pile. In suburban Illinois, residential waste management rules often dictate how long a container can remain on your property. Use a local expert who understands these nuances. If you need a reliable disposal partner in these states, book your dumpster online to ensure your project stays within regional compliance. Certified hazardous waste drop-off points are your best resource for disposing of old fuel or oil-based paints found inside the structure.
Permits and HOA Compliance
Homeowners in high-density areas like Queens or San Francisco face additional hurdles. Homeowners Associations (HOAs) often have strict rules regarding dumpster placement and the duration of demolition projects. Check your bylaws before the delivery truck arrives. If you cannot fit a container on your driveway, you'll likely need a street permit from the local Department of Transportation. These permits ensure you aren't blocking fire hydrants or obstructing traffic. Failing to secure the proper paperwork can result in fines that exceed the cost of the demolition itself. Clear communication with your neighbors and local board prevents these avoidable setbacks.
Final Clean Up and Site Restoration: Preparing for What's Next
The structure is down, but your project isn't finished until the ground is safe. Perform a final shed demolition clean up sweep to remove the smallest, most dangerous remnants. Run a high-strength magnetic sweeper over the entire footprint and the 10-foot buffer zone. This step is essential for recovering nails, screws, and metal brackets hidden in the grass. One missed fastener can ruin a lawnmower tire or cause a serious foot injury. Inspect the site for any remaining small scraps of wood or shingles that didn't make it into the container during the main teardown. A clean site is a safe site.
Review your dumpster load before calling for pickup. Ensure the debris is distributed evenly and sits below the top rail of the container. Haulers cannot legally transport overfilled bins. Check one last time for prohibited items like the chemicals or fuel tanks mentioned in previous sections. If you find them, remove them immediately to avoid contamination fees. This final audit ensures a smooth, predictable exit for your shed demolition clean up waste. Once the container is gone, you can focus on restoring the landscaping and soil health.
Site Leveling and Foundation Prep
Address soil compaction issues immediately. The earth under an old shed is often packed tight from years of pressure, which prevents proper drainage and stunts new landscaping. Use a rototiller to loosen the top six inches of soil and mix in fresh organic matter. Remove old concrete piers or gravel pads safely using a pry bar and sledgehammer. If you are preparing the area for a new shed from Book Your Dumpster, ensure the ground is perfectly level and stable. Add fresh topsoil or a new gravel base to create a high-functioning foundation that prevents future structural shifting or water pooling.
The Easy Way Out: Booking Your Final Debris Removal
Choosing a professional roll off dumpster rental service provides a stress-free finish to an inherently messy project. You avoid the physical toll of manual loading and the high costs of multiple landfill trips. Professional construction debris removal beats DIY every time by consolidating your logistical needs into a single, predictable transaction. It moves you from a state of clutter to a state of resolution with minimal cognitive load. Don't let a pile of old wood linger in your yard. Book your 10-yard dumpster today and clear the way for your next project with total confidence.
Clear the Way for Your Next Project
Your old shed is finally down. The site is nearly ready for its next purpose. By following a systematic takedown and prioritizing safety checks for hazardous materials, you have managed a complex task with professional-grade efficiency. The success of your shed demolition clean up depends on this final transition from a debris pile to a clean, level site. Don't let the remaining waste stall your progress or create a safety hazard for your family. Finalize your project with a disposal strategy that matches your hard work and attention to detail.
Book your 10-yard dumpster for shed demolition today at Book Your Dumpster USA. We provide reliable service across NY, NJ, IL, MA, and San Francisco. Our streamlined system allows you to secure 10, 20, 30, or 40-yard containers with easy online booking in under five minutes. We prioritize pricing integrity and punctuality so you can focus on your construction timeline. Take control of your backyard today. With the right disposal partner, you move from clutter to resolution quickly and affordably. Your new project starts here.
Frequently Asked Questions
Do I need a permit for shed demolition clean up in New Jersey?
Permit requirements in New Jersey are determined by your specific municipality. Factors like the shed's total square footage, its proximity to other structures, and whether it has active utility connections influence the need for a permit. Contact your local building department before starting your shed demolition clean up to verify current fees and avoid municipal fines.
What size dumpster do I need for a 10x12 wooden shed?
A 10-yard dumpster is the primary recommendation for a standard 10x12 wooden shed. This container size provides enough volume for the framing, siding, and roofing materials while maintaining a compact footprint on your property. If the shed is filled with old furniture or heavy equipment, you might consider sizing up to a 20-yard dumpster to accommodate the extra bulk.
Can I put pressure-treated wood from an old shed in a rental dumpster?
Yes, you can typically place pressure-treated wood in a rental dumpster, but it must be handled as construction and demolition debris. This material contains chemical preservatives that prevent it from being burned or composted. Ensure you separate it from general household trash to comply with state-specific disposal regulations in areas like New York and New Jersey.
How much does it typically cost to dispose of shed demolition debris?
Total disposal costs depend on your location and the volume of waste generated. Renting a dumpster is generally the most cost-effective method for homeowners who choose the DIY route. Remember to factor in local permit fees and the cost of any specialized disposal for hazardous materials like lead paint or asbestos shingles found during the shed demolition clean up.
What is the fastest way to tear down a shed by myself?
The most efficient method is a systematic top-down disassembly. Start by removing the shingles and roof sheathing to lighten the load on the walls. Once the roof is gone, take out the doors and windows before using a reciprocating saw to cut the wall studs into sections. This keeps the debris organized and prevents a dangerous, unpredictable collapse of the structure.
Are there items inside my shed that I cannot put in a roll-off dumpster?
You cannot put hazardous liquids, old chemicals, or fuel tanks in a standard roll-off container. Items like pesticides, fertilizers, propane tanks, and oil-based paints require specialized handling. Set these aside and take them to a local household hazardous waste collection site to ensure they are processed safely and legally.
How do I protect my driveway when renting a dumpster for demolition?
Place two sheets of thick plywood on the ground where the dumpster will be positioned. Ensure the wood is placed exactly where the container's steel wheels and rails will rest. This simple step distributes the weight of the heavy demolition debris and prevents the metal from scratching or cracking your asphalt or concrete surface.
Should I hire a junk removal service or rent a dumpster for a shed takedown?
Renting a dumpster is usually the better choice for structural demolition because it allows you to manage the site as you work. Junk removal services often charge based on the number of truckloads, which can become expensive for a full shed teardown. A roll-off container provides a single, predictable disposal solution that matches your project timeline.


